C#设计多功能关机程序
www.wenhui.org 11/18/2002 CSharp vs Java
许多软件都有自动关机功能,特别是在长时间下载的时候,这个功能可是使你不用以守候在计算机前面,而电脑却能按照您事先的设定自动关闭。现在我们用visual C#来编写一个多功能的关机程序。该程序具有:定时关机、倒计时关机、关机提醒、系统信息获取等四项功能, 可设定关机时间精确到秒。并且让你很快掌握Visual C#中对API的操作程序。
熟悉windows的用户对操作系统的关机程序一定了解,您是不是觉得它的功能不是很多。许多软件都有自动关机功能,比如一些下载软件,这一功能能让您半夜踏踏实实地睡个好觉,而电脑却能按照您事先的设定自动关闭 , 您在使用电脑听音乐、看电影、或是下载等一些自动功能的时候,是不是经常为忘记关机而心痛不已。现在我们用visual C#来编写一个多功能的关机程序。该程序具有:定时关机、倒计时关机、关机提醒、系统信息获取等四项功能, 可设定关机时间精确到秒。并且让你很快掌握Visual C#中对API的操作程序。编写过程如下
一. 设计关闭Windows窗体
1. 界面的设计
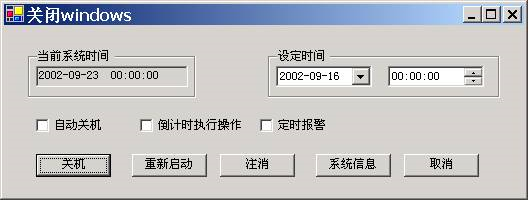
新建一个标准工程,向工程中增加一个Windows窗体并向窗体中添加如下控件,并分别设置其属性:
| 控件名 | 类别 | Text | 控件名 | 类别 | Text |
|---|---|---|---|---|---|
| CheckBox1 | CheckBox | 自动关机 | GroupBox1 | GroupBox | 当前系统时间 |
| CheckBox1 | CheckBox | 倒计时执行操作 | GroupBox2 | GroupBox | 设定时间 |
| CheckBox1 | CheckBox | 定时报警 | TxtTime | TextBox | |
| ButCancle | Button | 取消 | SetupTime | DateTimePicker | |
| ButReOpen | Button | 重新启动 | SetupDate | DateTimePicker | |
| ButClose | Button | 关机 | Timer1 | Timer | 100 |
| ButSysInto | Button | 系统信息 | ButReLogin | Button | 注消 |
Windows窗体界面:

将窗体属性中的caption设置为"关闭windows",名称设置为"frmmain"。
2. 在窗体类中引用API函数
API函数是构筑Windows应用程序的基石,是Windows编程的必备利器。每一种Windows应用程序开发工具都提供了间接或直接调用了Windows API函数的方法,或者是调用Windows API函数的接口,也就是说具备调用动态连接库的能力。Visual C#和其它开发工具一样也能够调用动态链接库的API函数。
在Visual C#中调用API的基本过程:
首先,在调用API之前,你必须先导入System.Runtime.InteropServices这个名称空间。该名称空间包含了在Visual C#中调用API的一些必要集合,具体的方法如下:
using System.Runtime.InteropServices;
using System.Text;
在导入了名称空间后,我们要声明在程序中所要用到的API函数。我们的程序主要是获取系统的相关信息,所以用到的API函数都是返回系统信息的。先给出在Visual C#中声明API的方法:
[DllImport("user32")]
public static extern long SetWindowPos(long hwnd , long hWndInsertAfter, long X , long y , long cx, long cy, long wFlagslong);
其中,"DllImport"属性用来从不可控代码中调用一个方法,它指定了DLL的位置,该DLL中包含调用的外部方法;"kernel32"设定了类库名;"public"指明函数的访问类型为公有的;"static"修饰符声明一个静态元素,而该元素属于类型本身而不是指定的对象;"extern"表示该方法将在工程外部执行,同时使用DllImport导入的方法必须使用"extern"修饰符;最后GetWindowsDirectory函数包含了两个参数,一个为StringBuilder类型的,另一个为int类型的,该方法返回的内容存在于StringBuilder类型的参数中。同时,因为我们在这里使用到了StringBuilder类,所以在程序的开始处,我们还得添加System.Text这个名称空间,方法同上。
声明其它的在程序中所要用到的API函数:
[DllImport("user32")]
public static extern long ExitWindowsEx(long uFlags, long dwReserved);
[DllImport("shell32")]
public static extern long ShellAbout(long uFlags, long dwReserved);
3. 增加窗体类的变量
long dwReserved;
const int SHUTDOWN = 1;
const int REBOOT = 2;
const int LOGOFF = 0;
long sh;
int counter , n;
4. 编写窗体类的方法
在窗体的Load(事件过程中编写如下代码:
private void frmmain1_Load(object sender, System.EventArgs e)
{
    file://用系统时间初始化组件
    Time.Text = System.DateTime.Today.ToShortDateString() + " "+ System.DateTime.Today.ToLongTimeString();
}
在组件Timer1的OnTimer事件过程中编写如下代码:
// 在组件Timer1的OnTimer事件过程中编写如下代码:
private void Timer1_Timer(object sender, System.EventArgs e)
{
    file://接收当前日期和时间,用于即时显示
    string CurrDate=System.DateTime.Today.ToShortDateString();
    string CurrTime=System.DateTime.Today.ToShortTimeString();
    file://随时检测设定的关机日期和时间是否有效
    if( this.CheckBox1.Checked == true)
    {
        if(CurrDate== SetupDate.ToString() && CurrTime==SetupTime.ToString())
            ColseComputer();
    }
}

private void ColseComputer()
{
    sh = ExitWindowsEx(SHUTDOWN, dwReserved);
}

private void button1_Click(object sender, System.EventArgs e)
{
    Form2 frm=new Form2( ) ;
    frm.Show( ) ;
}

private void ButReOpen_Click(object sender, System.EventArgs e)
{
    sh = ExitWindowsEx(REBOOT, dwReserved);
}

private void ButReLogin_Click(object sender, System.EventArgs e)
{
    sh = ExitWindowsEx(LOGOFF, dwReserved);
}

private void ButCancle_Click(object sender, System.EventArgs e)
{
    this.Close();
}

private void ButClose_Click_1(object sender, System.EventArgs e)
{
    sh = ExitWindowsEx(REBOOT, dwReserved);
}
二. 设计获取系统信息的Windows窗体
1. 界面的设计
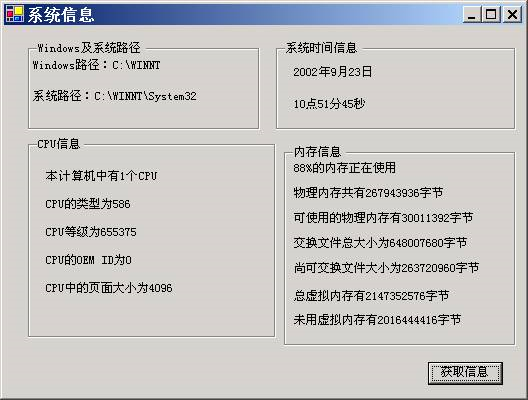
向工程中增加一个Windows窗体并向窗体中添加如下控件:

2. 在窗体类中引用API函数
using System.Runtime.InteropServices ;
using System.Text ;
[DllImport("kernel32")]
public static extern void GetWindowsDirectory(StringBuilder WinDir,int count);

[DllImport("kernel32")]
public static extern void GetSystemDirectory(StringBuilder SysDir,int count);

[DllImport("kernel32")]
public static extern void GetSystemInfo(ref CPU_INFO cpuinfo);

[DllImport("kernel32")]
public static extern void GlobalMemoryStatus(ref MEMORY_INFO meminfo);

[DllImport("kernel32")]
public static extern void GetSystemTime(ref SYSTEMTIME_INFO stinfo);
以上几个API的作用分别是获取系统路径,获得CPU相关信息,获得内存的相关信息,获得系统时间等。
3. 定义以下各结构
在声明完所有的API函数后,我们发现后三个函数分别用到了CPU_INFO、MEMORY_INFO、SYSTEMTIME_INFO等结构,这些结构并非是.Net内部的,它们从何而来?其实,我们在用到以上API调用时均需用到以上结构,我们将函数调用获得的信息存放在以上的结构体中,最后返回给程序输出。这些结构体比较复杂,但是如果开发者能够熟练运用,那么整个API世界将尽在开发者的掌握之中。以下就是上述结构体的声明:
//定义CPU的信息结构
[StructLayout(LayoutKind.Sequential)]
public struct CPU_INFO
{
    public uint dwOemId;
    public uint dwPageSize;
    public uint lpMinimumApplicationAddress;
    public uint lpMaximumApplicationAddress;
    public uint dwActiveProcessorMask;
    public uint dwNumberOfProcessors;
    public uint dwProcessorType;
    public uint dwAllocationGranularity;
    public uint dwProcessorLevel;
    public uint dwProcessorRevision;
}

file://定义内存的信息结构
[StructLayout(LayoutKind.Sequential)]
public struct MEMORY_INFO
{
    public uint dwLength;
    public uint dwMemoryLoad;
    public uint dwTotalPhys;
    public uint dwAvailPhys;
    public uint dwTotalPageFile;
    public uint dwAvailPageFile;
    public uint dwTotalVirtual;
    public uint dwAvailVirtual;
}

file://定义系统时间的信息结构
[StructLayout(LayoutKind.Sequential)]
public struct SYSTEMTIME_INFO
{
    public ushort wYear;
    public ushort wMonth;
    public ushort wDayOfWeek;
    public ushort wDay;
    public ushort wHour;
    public ushort wMinute;
    public ushort wSecond;
    public ushort wMilliseconds;
}
5. 编写窗体类的方法
using System.Security.Cryptography;
using System.Text;

private void button1_Click(object sender, System.EventArgs e)
{
file://调用GetWindowsDirectory和GetSystemDirectory函数分别取得Windows路径和系统路径
    const int nChars = 128;
    StringBuilder Buff = new StringBuilder(nChars);
    GetWindowsDirectory(Buff, nChars);
    WindowsDirectory.Text = "Windows路径:" + Buff.ToString();
    GetSystemDirectory(Buff, nChars);
    SystemDirectory.Text = " 系统路径:" + Buff.ToString();

file://调用GetSystemInfo函数获取CPU的相关信息
    CPU_INFO CpuInfo;
    CpuInfo = new CPU_INFO();
    GetSystemInfo(ref CpuInfo);
    NumberOfProcessors.Text = "本计算机中有" + CpuInfo.dwNumberOfProcessors.ToString() + "个CPU";
    ProcessorType.Text = "CPU的类型为" + CpuInfo.dwProcessorType.ToString();
    ProcessorLevel.Text = "CPU等级为" + CpuInfo.dwProcessorLevel.ToString();
    OemId.Text = "CPU的OEM ID为" + CpuInfo.dwOemId.ToString();
    PageSize.Text = "CPU中的页面大小为" + CpuInfo.dwPageSize.ToString();

file://调用GlobalMemoryStatus函数获取内存的相关信息
    MEMORY_INFO MemInfo;
    MemInfo = new MEMORY_INFO();
    GlobalMemoryStatus(ref MemInfo);
    MemoryLoad.Text = MemInfo.dwMemoryLoad.ToString() + "%的内存正在使用";
    TotalPhys.Text = "物理内存共有" + MemInfo.dwTotalPhys.ToString() + "字节";
    AvailPhys.Text = "可使用的物理内存有" + MemInfo.dwAvailPhys.ToString() + "字节";
    TotalPageFile.Text = "交换文件总大小为" + MemInfo.dwTotalPageFile.ToString() + "字节";
    AvailPageFile.Text = "尚可交换文件大小为" + MemInfo.dwAvailPageFile.ToString() + "字节";
    TotalVirtual.Text = "总虚拟内存有" + MemInfo.dwTotalVirtual.ToString() + "字节";
    AvailVirtual.Text = "未用虚拟内存有" + MemInfo.dwAvailVirtual.ToString() + "字节";

file://调用GetSystemTime函数获取系统时间信息
    SYSTEMTIME_INFO StInfo;
    StInfo = new SYSTEMTIME_INFO();
    GetSystemTime(ref StInfo);
    Date.Text = StInfo.wYear.ToString() + "年" + StInfo.wMonth.ToString() + "月" + StInfo.wDay.ToString() + "日";
    Time.Text = (StInfo.wHour + 8).ToString() + "点" + StInfo.wMinute.ToString() + "分" + StInfo.wSecond.ToString() + "秒";
}
三. 结束语
上面介绍了Visual C#开发多功能关机程序的整个过程,该程序有一定的实用价值。通过本文的学习,我相信稍有API使用基础的开发者可以马上触类旁通,很快掌握Visual C#中对API的操作。上面给出的实例仅仅是一个简单的程序,不过有兴趣的读者可以进一步完善其功能,做出更完美的系统应用程序。
原作者:痕迹
来 源:本站
共有343位读者阅读过此文