C#中实现窗体间的数据传递
一个稍微复杂一点的程序一般都有二个或者更多的窗体。有时在程序设计中,数据不仅要在同一个窗体中传递,还要在窗体间传递,这种传递是主窗体与从窗体之间数据的互相传递。从本文开始,我们将列举不同窗体间数据传递的四种情况,和用Visual C#实现这四种情况的具体方法。下面先介绍用Visual C#实现窗体间传递数据中第一种情况——从主窗体向从窗体传递字符串。在阅读完本文后,你还尝试一下利用此方法在窗体间传送数值等数据。
本文中程序设计、调试、运行的软件环境
Windows2000 服务器版
Visual Studio.Net正式版,.Net FrameWork SDK版本号3705
实现步骤
1.启动Visual Studio .Net
2.选择菜单【文件】|【新建】|【项目】后,弹出【新建项目】对话框
3.将【项目类型】设置为【Visual C#项目】
4.将【模板】设置为【控制台应用程序】
5.在【名称】文本框中输入【VC#中不同窗体数据传递方法01】
6.在【位置】的文本框中输入【E:\VS.NET项目】,然后单击【确定】按钮,这样VC#中不同窗体数据传递方法01项目就创建完成了
7.把Visual Studio.Net的当前窗口切换到【Form1.cs(设计)】窗口,并从【工具箱】中的【Windows窗体】选项卡中拖入下列组件到【Form1.cs(设计)】窗体中,并执行相应操作:
- 二个TextBox组件,用以输入向Form2窗体传送的数据
- 二个Label组件
- 一个Button组件,名称为button1,并在拖入【Form1.cs(设计)】窗体后,双击它,则Visual Stuido .Net产生其Click事件对应的处理代码。
8.把Visual Studio .Net的当前窗口切换到【Form1.cs】窗口,即:Form1.cs的代码编辑窗口。并用下列代码替换替代系统产生的InitializeComponent过程。
private void InitializeComponent()
{
    this.button1 = new System.Windows.Forms.Button();
    this.textBox1 = new System.Windows.Forms.TextBox();
    this.textBox2 = new System.Windows.Forms.TextBox();
    this.label1 = new System.Windows.Forms.Label();
    this.label2 = new System.Windows.Forms.Label();
    this.SuspendLayout();
    this.button1.Location = new System.Drawing.Point(103, 149);
    this.button1.Name = "button1";
    this.button1.Size = new System.Drawing.Size(75, 36);
    this.button1.TabIndex = 0;
    this.button1.Text = "发送";
    this.button1.Click += new System.EventHandler(this.button1_Click);
    this.textBox1.Location = new System.Drawing.Point(93, 56);
    this.textBox1.Name = "textBox1";
    this.textBox1.Size = new System.Drawing.Size(122, 21);
    this.textBox1.TabIndex = 1;
    this.textBox1.Text = "";
    this.textBox2.Location = new System.Drawing.Point(93, 99);
    this.textBox2.Name = "textBox2";
    this.textBox2.Size = new System.Drawing.Size(123, 21);
    this.textBox2.TabIndex = 2;
    this.textBox2.Text = "";
    this.label1.Location = new System.Drawing.Point(29, 57);
    this.label1.Name = "label1";
    this.label1.TabIndex = 3;
    this.label1.Text = "欢迎词:";
    this.label2.Location = new System.Drawing.Point(16, 100);
    this.label2.Name = "label2";
    this.label2.TabIndex = 4;
    this.label2.Text = "提示信息:";
    this.AutoScaleBaseSize = new System.Drawing.Size(6, 14);
    this.ClientSize = new System.Drawing.Size(263, 223);
    this.Controls.AddRange(new System.Windows.Forms.Control[] {
          this.textBox2 ,
          this.textBox1 ,
          this.button1 ,
          this.label2 ,
          this.label1 });
    this.Name = "Form1";
    this.Text = "Form1";
    this.Load += new System.EventHandler(this.Form1_Load);
    this.ResumeLayout(false);
}
此时,VC#中不同窗体数据传递方法01项目的主窗体Form1的设计界面就完成了,具体如图1所示:
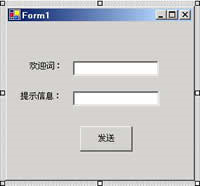
图1:VC#中不同窗体数据传递方法01项目主窗体设计界面
9.把Visual Studio.Net的当前窗口切换到Form1.cs的代码编辑窗口,并用下列代码替换Form1.cs中button1组件的Click事件对应的处理代码。
private void button1_Click(object sender, System.EventArgs e)
{
    Form2 myForm = new Form2(textBox1.Text, textBox2.Text);
    myForm.Show();
}
10.选择菜单【项目】|【添加Windows窗体】后,弹出【添加新项-VC#中不同窗体数据传递方法01】对话框。在此对话框中的【名称(N):】文本框中输入【Form2】后,单击【打开】按钮,则在VC#中不同窗体数据传递方法01项目中添加了一个新的窗体,名称为【Form2】。
11.把Visual Studio.Net的当前窗口切换到【Form2.cs(设计)】窗口,并从【工具箱】中的【Windows窗体】选项卡中拖入下列组件到【Form2.cs(设计)】窗体中,并执行相应操作:
- 二个TextBox组件,用以显示从Form1传送来的字符串数据
- 二个Label组件
- 一个Button组件,名称为button1,并在拖入【Form2.cs(设计)】窗体后,双击它,则Visual Stuido .Net产生其Click事件对应的处理代码。
12.把Visual Studio.Net的当前窗口切换到Form2.cs的代码编辑窗口,并在定义Form2代码的后部添加下列代码,下列代码是定义二个字符串变量,用以接收从Form1传送来的字符串数据:
private string str1 , str2 ;
13.并用下列代码替换系统产生的Form2对应的代码:
public Form2 (string sendData01, string sendData02)
{
    //
    // Windows 窗体设计器支持所必需的
    //
    InitializeComponent();
    str1 = sendData01;
    str2 = sendData02;
    //
    // TODO: 在 InitializeComponent 调用后添加任何构造函数代码
    //
}
14.用下列代码替换Form2.cs中的由Visual Studio .Net系统产生的InitializeComponent过程:
private void InitializeComponent()
{
    this.textBox2 = new System.Windows.Forms.TextBox();
    this.textBox1 = new System.Windows.Forms.TextBox();
    this.button1 = new System.Windows.Forms.Button();
    this.label2 = new System.Windows.Forms.Label();
    this.label1 = new System.Windows.Forms.Label();
    this.SuspendLayout();
    this.textBox2.Location = new System.Drawing.Point(109, 93);
    this.textBox2.Name = "textBox2";
    this.textBox2.Size = new System.Drawing.Size(123, 21);
    this.textBox2.TabIndex = 7;
    this.textBox2.Text = "";
    this.textBox1.Location = new System.Drawing.Point(109, 50);
    this.textBox1.Name = "textBox1";
    this.textBox1.Size = new System.Drawing.Size(122, 21);
    this.textBox1.TabIndex = 6;
    this.textBox1.Text = "";
    this.button1.Location = new System.Drawing.Point(75, 143);
    this.button1.Name = "button1";
    this.button1.Size = new System.Drawing.Size(119, 43);
    this.button1.TabIndex = 5;
    this.button1.Text = "显示传送来数据";
    this.button1.Click += new System.EventHandler(this.button1_Click);
    this.label2.Location = new System.Drawing.Point(32, 94);
    this.label2.Name = "label2";
    this.label2.TabIndex = 9;
    this.label2.Text = "提示信息:";
    this.label1.Location = new System.Drawing.Point(45, 51);
    this.label1.Name = "label1";
    this.label1.TabIndex = 8;
    this.label1.Text = "欢迎词:";
    this.AutoScaleBaseSize = new System.Drawing.Size(6, 14);
    this.ClientSize = new System.Drawing.Size(265, 228);
    this.Controls.AddRange(new System.Windows.Forms.Control[] {
          this.textBox2 ,
          this.textBox1 ,
          this.button1 ,
          this.label2 ,
          this.label1 });
    this.Name = "Form2";
    this.Text = "Form2";
    this.ResumeLayout(false);
}
15.用下列代码替换Form2.cs中button1组件Click事件对应的处理代码,下列代码的作用是把从Form1窗体中接收来的字符串数据通过同样的方式显示出来:
private void button1_Click(object sender, System.EventArgs e)
{
    textBox1.Text = str1;
    textBox2.Text = str2;
}
16.至此,在上述步骤都正确完成,并全部保存后,VC#中不同窗体数据传递方法01项目的全部工作就完成了。图02是VC#中不同窗体数据传递方法01程序的运行界面。其中Form2中显示出来的字符串就是从主窗体中传递过去的。
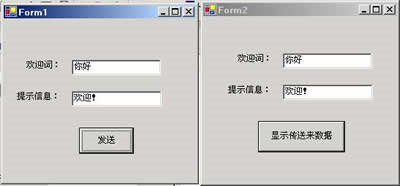
图02:VC#中不同窗体数据传递方法01程序的运行界面
总结
用Visual C#实现窗体间数据传递的第一种情况的全部工作就完成了,细心的读者已经发现,这种方法明显存在一个主要缺点,就是主窗体向从窗体传递数据的数目是固定的。这个缺点将在下一篇文章中彻底加以解决。
在上一篇文章中我们曾经指出指出,窗体间数据传递第一种情况的解决方法存在一个主要的缺点,就是窗体间传递的参数数目是固定的,并且类型也是固定的。这是因为,上文中修改了从命名空间System.Windows.Forms中的Form类派生而得到的Form2类的构造函数,由于构造函数中的参数和类型都是固定的,而主窗体向从窗体传递数据,就是通过构造函数中的参数来实现的,所以就造成了上面的那个缺点。其实在这种方法中还存在一个缺点,就是每一次窗体间的数据传递,就必须构建一个窗体,并且这种数据传递是一次性的。这些缺点对于窗体间传递少量数据,一般不会有太大影响,但如果要传递大量数据,并且要通过主窗体来实时向从窗体传递数据,使用这种方法就勉为其难了。
下面介绍另外一种从主窗体向从窗体传递数据的实现方法,这种方法能够完全解决上面的二个缺点,程序在主窗体中就像操作窗体中加入的组件一样,灵活的操作从窗体。
设计思路
此方法实现二个功能:
其一,主窗体能够实时地向从窗体传送数据,表现为当更改主窗体中的跟踪条(TrackBar)的数值,从窗体中定义的一个Label组件就显示出跟踪条的当前数值;
其二,从窗体能够向主窗体提出数据请求,并且能够获取主窗体中各组件显示的数据。程序表现为,当单击从窗体中的【从Form1中获取数据】按钮,程序能够把主窗体中的二个TextBox组件显示的内容传递到从窗体,并且通过从窗体中的二个TextBox组件分别显示出来。
第一个功能的实现思路是把从窗体看成是主窗体的一个实例,加入到从窗体中的组件,可以看出是从窗体中定义的一个个变量,由于从窗体中加入的组件的组件缺省定义类型是Private(私有的),所以要想访问这些组件,必须改变为Public(共有的);而第二个功能的实现思路是通过修改Form2的构造函数,构造函数实现功能是通过Form1类的实例(即为主窗体)来创建并初始化Form2类的实例(即为从窗体)。这样对于从窗体来说,主窗体则为其一个实例,从而也就可以向主窗体提出数据请求,当然要把需要访问的各组件定义类型从缺省的Private(私有的)类型修改为Public(共有的)。上述二个功能的实现方法,第二种方法比较复杂,希望各位能够结合后面的具体实现代码来理解。
第二种窗体间的数据传递情况实现步骤
1.首先创建一个Visual C#的项目文件,项目名称为【VC#中不同窗体数据传递方法02】。
2.把Visual Studio .Net的当前窗口切换到【Form1.cs(设计)】窗口,并从【工具箱】中的【Windows窗体】选项卡中拖入下列组件到【Form1.cs(设计)】窗体中,并执行相应操作:
- 二个TextBox组件,用以输入向Form2窗体传送的数据
- 二个Label组件
- 一个TrackBar组件,名称为trackBar1。
3.把Visual Studio .Net的当前窗口切换到【Form1.cs】窗口,即:Form1.cs的代码编辑窗口。并用下列代码替换替代系统产生的InitializeComponent过程。
private void InitializeComponent()
{
    this.label1 = new System.Windows.Forms.Label();
    this.label2 = new System.Windows.Forms.Label();
    this.textBox1 = new System.Windows.Forms.TextBox();
    this.textBox2 = new System.Windows.Forms.TextBox();
    this.trackBar1 = new System.Windows.Forms.TrackBar();
    ((System.ComponentModel.ISupportInitialize)(this.trackBar1)).BeginInit();
    this.SuspendLayout();
    this.label1.Location = new System.Drawing.Point(27, 41);
    this.label1.Name = "label1";
    this.label1.TabIndex = 0;
    this.label1.Text = "欢迎词:";
    this.label2.Location = new System.Drawing.Point(27, 83);
    this.label2.Name = "label2";
    this.label2.TabIndex = 1;
    this.label2.Text = "提示信息:";
    this.textBox1.Location = new System.Drawing.Point(108, 38);
    this.textBox1.Name = "textBox1";
    this.textBox1.TabIndex = 2;
    this.textBox1.Text = "";
    this.textBox2.Location = new System.Drawing.Point(109, 78);
    this.textBox2.Name = "textBox2";
    this.textBox2.TabIndex = 3;
    this.textBox2.Text = "";
    this.trackBar1.LargeChange = 1;
    this.trackBar1.Location = new System.Drawing.Point(12, 182);
    this.trackBar1.Maximum = 100;
    this.trackBar1.Name = "trackBar1";
    this.trackBar1.Size = new System.Drawing.Size(272, 42);
    this.trackBar1.TabIndex = 1;
    this.trackBar1.ValueChanged += new System.EventHandler(
        this.trackBar1_ValueChanged);
    this.AutoScaleBaseSize = new System.Drawing.Size(6, 14);
    this.ClientSize = new System.Drawing.Size(292, 273);
    this.Controls.AddRange(new System.Windows.Forms.Control[] {
          this.trackBar1 ,
          this.textBox2 ,
          this.textBox1 ,
          this.label2 ,
          this.label1 });
    this.MaximizeBox = false;
    this.MinimizeBox = false;
    this.Name = "Form1";
    this.Text = "Form1";
    this.Load += new System.EventHandler(this.Form1_Load);
    ((System.ComponentModel.ISupportInitialize)(this.trackBar1)).EndInit();
    this.ResumeLayout(false);
}
4.由于从窗体向主窗体提出的数据请求是二个TextBox组件的"Text"属性值,所以要修改Form1.cs文件中这二个TextBox组件的定义类型,把缺省定义为"private"类型修改为"public"类型,修改后的这二个TextBox组件在Form1.cs中的定义语句如下:
public System.Windows.Forms.TextBox textBox1;
public System.Windows.Forms.TextBox textBox2;
在上述代码后面再添加下面代码,下面代码是创建一个Form2类的实例m_Form,即从窗体:
private Form2 m_Form ;
5.在Form1.cs中的Main函数后,添加下列代码,下列代码的功能是实现当修改主窗体中的跟踪条数值后,从窗体中的label3组件的显示数值能够随之而变化,这样就实现主窗体实时传递数据到从窗体了:
private void trackBar1_ValueChanged(object sender, System.EventArgs e)
{
    m_Form.label3.Text = trackBar1.Value.ToString();
}
6.在添加完上面代码,并在其后部,再添加下列代码,下列代码的功能是使用Form2类的构造函数,并通过Form1类的实例来创建并初始化Form2类的实例。在项目文件中加入Form2类,并修改Form2类的构造函数工作将在本节的第7到11步骤中完成。
private void Form1_Load (object sender , System.EventArgs e)
{
    m_Form = new Form2 (this);
    //通过主窗体来创建、初始化从窗体
    m_Form.Show();
    //显示从窗体
}
7.选择菜单【项目】|【添加Windows窗体】后,弹出【添加新项-VC#中不同窗体数据传递方法01】对话框。在此对话框中的【名称(N):】文本框中输入【Form2】后,单击【打开】按钮,则在VC#中不同窗体数据传递方法01项目中添加了一个新的窗体,名称为【Form2】。
8.把Visual Studio .Net的当前窗口切换到【Form2.cs(设计)】窗口,并从【工具箱】中的【Windows窗体】选项卡中拖入下列组件到【Form2.cs(设计)】窗体中,并执行相应操作:
- 二个TextBox组件,用以显示向主窗体请求获得的数据。
- 二个Label组件。
- 一个Button组件,名称为button1。
9.把Visual Studio .Net的当前窗口切换到【Form2.cs】窗口,即:Form2.cs的代码编辑窗口。并用下列代码替换替代系统产生的InitializeComponent过程。
{
    this.textBox1 = new System.Windows.Forms.TextBox();
    this.textBox2 = new System.Windows.Forms.TextBox();
    this.label2 = new System.Windows.Forms.Label();
    this.label1 = new System.Windows.Forms.Label();
    this.button1 = new System.Windows.Forms.Button();
    this.label3 = new System.Windows.Forms.Label();
    this.SuspendLayout();
    this.textBox1.Location = new System.Drawing.Point(95, 42);
    this.textBox1.Name = "textBox1";
    this.textBox1.Size = new System.Drawing.Size(125, 21);
    this.textBox1.TabIndex = 2;
    this.textBox1.Text = "";
    this.textBox2.Location = new System.Drawing.Point(94, 80);
    this.textBox2.Name = "textBox2";
    this.textBox2.Size = new System.Drawing.Size(127, 21);
    this.textBox2.TabIndex = 3;
    this.textBox2.Text = "";
    this.label2.Location = new System.Drawing.Point(27, 83);
    this.label2.Name = "label2";
    this.label2.TabIndex = 5;
    this.label2.Text = "提示信息:";
    this.label1.Location = new System.Drawing.Point(38, 45);
    this.label1.Name = "label1";
    this.label1.TabIndex = 4;
    this.label1.Text = "欢迎词:";
    this.button1.Location = new System.Drawing.Point(80, 136);
    this.button1.Name = "button1";
    this.button1.Size = new System.Drawing.Size(135, 53);
    this.button1.TabIndex = 6;
    this.button1.Text = "从Form1中获取数据";
    this.button1.Click += new System.EventHandler(this.button1_Click);
    this.label3.Location = new System.Drawing.Point(102, 210);
    this.label3.Name = "label3";
    this.label3.TabIndex = 7;
    this.AutoScaleBaseSize = new System.Drawing.Size(6, 14);
    this.ClientSize = new System.Drawing.Size(292, 273);
    this.Controls.AddRange(new System.Windows.Forms.Control[] {
          this.label3 ,
          this.button1 ,
          this.textBox2 ,
          this.textBox1 ,
          this.label2 ,
          this.label1 });
    this.MaximizeBox = false;
    this.MinimizeBox = false;
    this.Name = "Form2";
    this.Text = "Form2";
    this.ResumeLayout(false);
}
10.由于主窗体是把其中的跟踪条的数值通过从窗体中的label组件来显示的,所以必须把Form2.cs文件中创建label3组件时定义的"private"类型修改为"public"类型,修改后的创建label3组件的代码为:
public System.Windows.Forms.Label label3;
由于Form2类的实例是通过Form1类的实例来初始化,所以在创建label3组件后面添加下列代码,下列代码是创建一个Form1类的实例,其作用是初始化Form2类的实例(即从窗体):
private Form1 mF_Form ;
11.修改Form2类的构造函数,具体操作如下,用下列代码替换Form2.cs中缺省的构造函数:
public Form2 ( Form1 myForm )
{
    //
    // Windows 窗体设计器支持所必需的
    //
    InitializeComponent ( ) ;
    this.mF_Form  = myForm ;
    //
    // TODO: 在 InitializeComponent 调用后添加任何构造函数代码
    //
}
12.在Form2.cs中的Main函数后,添加下列代码,下列代码的功能是实现向主窗体提出数据请求,并获取主窗体的数据,当然这些数据的类型必须修改为"public"类型。
private void button1_Click(object sender, System.EventArgs e)
{
    textBox1.Text = this.mF_Form.textBox1.Text;
    textBox2.Text = this.mF_Form.textBox2.Text;
}
13.至此,在上述步骤都成功完成,并全部保存后,Visual C#实现窗体间传递数据第二种情况的处理方法就全部完成了。此时单击快捷键【F5】就可以运行程序了,当调整Form1窗体的跟踪条数值,我们会发现Form2窗体中的label3组件显示的数值也随之变化;当在Form1窗体的二个TextBox组件中输入数据后,单击Form2窗体中的【从Form2中获取数据】按钮,则程序能够成功的从Form1中获取数据,并通过Form2中对应的TextBox组件显示出来。图01就是程序运行后的界面:
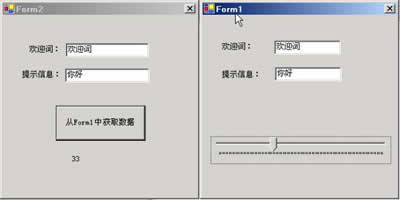
图01:【VC#中不同窗体数据传递方法02】程序的运行界面
小结
本节介绍的这种实现窗体间数据传送的方法要比第一篇介绍的方法要难许多,其难点就在于如何修改构造函数。对于那些要从其他窗体中要访问的数据,必须设定修改为"public",否则无法实现窗体间数据传递。
这二篇文章介绍的都是主窗体向从窗体传递数据,在下一篇文章中,将介绍从窗体向主窗体传递数据的实现方法。