第九章 配置和调度
在上一章,你学到如何创建一个通用语言运行时(CLR)组件,且如何在一个简单的测试应用程序中使用它。虽然CLR组件就要准备装载了,但你还是应该思考以下技术之一:
- 条件编译
- 文档注释
- 代码版本化
9.1 条件编译
没有代码的条件编译功能,我就不能继续工作。条件编译允许执行或包括基于某些条件的代码;例如,生成应用程序的一个查错(DEBUG)版本、演示(DEMO)版本或零售(RELEASE)版本。可能被包括或被执行的代码的例子为许可证代码、 屏幕保护或你出示的任何程序。
在C#中,有两种进行条件编译的方法:
- 预处理用法
- 条件属性
9.1.1 预处理用法
在C++中,在编译器开始编译代码之前,预处理步骤是分开的。在C#中,预处理被编译器自己模拟—— 没有分离的预处理。它只不过是条件编译。
尽管C#编译器不支持宏,但它具有必需的功能,依据符号定义的条件,排除和包括代码。以下小节介绍了在C#中受支持的各种标志,它们与在C++中看到的相似。
- 定义符号
- 依据符号排除代码
- 引起错误和警告
9.1.1.1 定义符号
你不能使用随C#编译器一起的预处理创建“define 标志:符号:定义 ”宏,但是,你仍可以定义符号。根据某些符号是否被定义,可以排除或包括代码。 第一种定义符号的办法是在C#源文件中使用 #define标志:
#define DEBUG
这样定义了符号DEBUG,且范围在它所定义的文件内。请注意,必须要先定义符号才能使用其它语句。例如,以下代码段是不正确的:
using System;
#define DEBUG
编译器将标记上述代码为错误。你也可以使用编译器定义符号(用于所有的文件):
csc /define:DEBUG mysymbols.cs
如果你想用编译器定义多种符号,只需用分号隔开它们:
csc /define:RELEASE;DEMOVERSION mysymbols.cs
在C#源文件中,对这两种符号的定义分为两行 #define 标志。
有时,你可能想要取消源文件中(例如,较大项目的源文件)的某种符号。可以用 #undef 标志取消定义:
#undef DEBUG
#define的“定义标志:符号: 定义”规则同样适用于#undef: 它的范围在自己定义的文件之内,要放在任何语句如using语句之前。
这就是全部有关用C#预处理定义符号和取消定义符号所要了解的知识。以下小节说明如何使用符号有条件地编译代码。
9.1.1.2 依据符号包括和排除代码
最重要的“if标志:符号:包括代码”方式的目的为,依据符号是否被定义,有条件地包括和排除代码。清单9.1 包含了已出现过的源码,但这次它依据符号被有条件地编译。
清单 9.1 利用 #if 标志有条件地包括代码
using System;

public class SquareSample
{
    public void CalcSquare(int nSideLength, out int nSquared)
    {
        nSquared = nSideLength * nSideLength;
    }

    public int CalcSquare(int nSideLength)
    {
        return nSideLength * nSideLength;
    }
}

class SquareApp
{
    public static void Main()
    {
        SquareSample sq = new SquareSample();

        int nSquared = 0;

#if CALC_W_OUT_PARAM
sq.CalcSquare(20, out nSquared);
#else
        nSquared = sq.CalcSquare(15);
#endif
        Console.WriteLine(nSquared.ToString());
    }
}
注意,在这个源文件中没有定义符号。当编译应用程序时,定义(或取消定义)符号:
csc /define:CALC_W_OUT_PARAM square.cs
根据“ if标志:符号:包括代码”的符号定义,不同的 CalcSquare 被调用了。用来对符号求值的模拟预处理标志为#if、 #else和 #endif。它们产生的效果就象C#相应的if 语句那样。你也可以使用逻辑“与”(&&)、逻辑“或”(||)以及“否”(!)。它们的例子显示在清单9.2 中。
清单 9.2 使用#elif 在#if标志中创建多个分支
// #define DEBUG
#define RELEASE
#define DEMOVERSION

#if DEBUG
#undef DEMOVERSION
#endif

using System;

class Demo
{
    public static void Main()
    {
#if DEBUG
        Console.WriteLine("Debug version");
#elif RELEASE && !DEMOVERSION
Console.WriteLine("Full release version");
#else
Console.WriteLine("Demo version");
#endif
    }
}
在这个“if标志:符号:包含代码”例子中,所有的符号都在C#源文件中被定义。注意第6行#undef语句增加的那部分。由于不编译DEBUG代码的DEMO版本(任意选择),我确信它不会被某些人无意中定义了,而且总当DEBUG被定义时,就取消DEMO版本的定义。
接着在第15~21行,预处理符号被用来包括各种代码。注意#elif标志的用法,它允许你把多个分支加到#if 标志。该代码运用逻辑操作符“&&”和非操作符“!”。也可能用到逻辑操作符“||”,以及等于和不等于操作符。
9.1.1.3 引起错误并警告
另一种可能的“警告 标志错误 标志”预处理标志的使用,是依据某些符号(或根本不依据,如果你这样决定)引起错误或警告。各自的标志分别为 #warning和#error,而清单9.3 演示了如何在你的代码中使用它们。
清单 9.3 使用预处理标志创建编译警告和错误
#define DEBUG
#define RELEASE
#define DEMOVERSION

#if DEMOVERSION && !DEBUG
#warning You are building a demo version
#endif

#if DEBUG && DEMOVERSION
#error You cannot build a debug demo version
#endif

using System;

class Demo
{
    public static void Main()
    {
        Console.WriteLine("Demo application");
    }
}
在这个例子中,当你生成一个不是DEBUG版本的DEMO版本时,就发出了一个编译警告(第5行~第7行)。当你企图生成一个DEBUG DEMO版本时,就引起了一个错误,它阻止了可执行文件的生成。对比起前面只是取消定义令人讨厌的符号的例子,这些代码告诉你,“警告 标志错误 标志”企图要做的工作被认为是错误的。这肯定是更好的处理办法。
9.1.1.4 条件属性
C++的预处理也许最经常被用来定义宏,宏可以解决一种程序生成时的函数调用,而却不能解决另一种程序生成时的任何问题。这些例子包括 ASSERT和TRACE 宏,当定义了DEBUG符号时,它们对函数调用求值,当生成一个RELEASE版本时,求值没有任何结果。
当了解到宏不被支持时,你也许会猜测,条件功能已经消亡了。幸亏我可以报道,不存在这种情况。你可以利用条件属性,依据某些已定义符号来包括方法:
[conditional("DEBUG")]
public void SomeMethod() { }
仅当符号DEBUG被定义时,这个方法被加到可执行文件。并且调用它,就象
SomeMethod();
当该方法不被包括时,它也被编译器声明。功能基本上和使用C++条件宏相同。
在例子开始之前,我想指出,条件方法必须具有void的返回类型,不允许其它返回类型。然而,你可以传递你想使用的任何参数。
在清单9.4 中的例子演示了如何使用条件属性重新生成具有C++的TRACE宏一样的功能。为简单起见,结果直接输出到屏幕。你也可以根据需要把它定向到任何地方,包括一个文件。
清单 9.4 使用条件属性实现方法
#define DEBUG

using System;

class Info
{
    [conditional("DEBUG")]
    public static void Trace(string strMessage)
    {
        Console.WriteLine(strMessage);
    }

    [conditional("DEBUG")]
    public static void TraceX(string strFormat, params object[] list)
    {
        Console.WriteLine(strFormat, list);
    }
}

class TestConditional
{
    public static void Main()
    {
        Info.Trace("Cool!");
        Info.TraceX("{0} {1} {2}", "C", "U", 2001);
    }
}
在Info类中,有两个静态方法,它们根据DEBUG符号被有条件地编译:Trace,接收一个参数,而TraceX则接收n个参数。Trace的实现直接了当。然而,TraceX实现了一个你从没有见过的关键字:params。
params 关键字允许你指定一个方法参数,它实际上接收了任意数目的参数。其类似C/C++的省略参数。注意,它必须是方法调用的最后一个参数,而且在参数列表中,你只能使用它一次。毕竟,它们的局限性极其明显。
使用params 关键字的意图就是要拥有一个Trace方法,该方法接收一个格式字符串以及无数个置换对象。幸好,还有一个支持格式字符串和对象数组的 WriteLine方法(第16行)。
这个小程序产生的哪一个输出完全取决于DEBUG是否被定义。当DEBUG符号被定义时,方法都被编译和执行。如果DEBUG不被定义,对Trace和TraceX的调用也随之消失。
条件方法是给应用程序和组件增加条件功能的一个真正强大的手段。用一些技巧,你就可以根据由逻辑“或”(||)以及逻辑“与”(&&)连接起来的多个符号,生成条件方法。然而,对于这些方案,我想给你推荐C#文档。
9.2 在XML中的文档注释
很多程序员根本不喜欢的一项任务就是写作,包括写注释和写文档。然而,有了C#,你就找到改变老习惯的好理由:你可以用代码的注释自动生成文档。
由编译器生成的输出结果是完美的XML。它可以作为组件文档的输入被使用,以及作为显示帮助并揭示组件内部细节的工具。例如, Visual Studio 7 就是这样一种工具。
这一节专门为你说明如何最好地运用C#的文档功能。该例子涉及的范围很广,所以你不能有这样的借口,说它过于复杂,以至很难领会如何加入文档注释。文档是软件极其重要的一部分,特别是要被其他开发者使用的组件的文档。
在以下小节中,文档注解用来说明RequestWebPage 类。我已分别在以下几小节中做出解释:
- 描述一个成员
- 添加备注和列表
- 提供例子
- 描述参数
- 描述属性
- 编译文档
9.2.1 描述一个成员
第一步,为一个成员添加一个简单的描述。你可以用 <summary> 标签这样做:
/// <summary>This is .... </summary>
每一个文档注释起始于由三个反斜杠组成的符号“///”。你可以把文档注释放在想要描述的成员之前:
/// <summary>Class to tear a Webpage from a Webserver</summary>
public class RequestWebPage
使用<para>和 </para>标签,为描述添加段落。用<see>标签引用其它已有了注释的成员。
/// <para>Included in the <see cref="RequestWebPage"/> class</para>
增加一个链接到RequestWebPage类的描述。注意,用于标签的语法是XML语法,这意味着标签大写化的问题,而且标签必须正确地嵌套。
当为一个成员添加文档时,另一个有趣的标签是<seealso> 。它允许你描述可能使读者非常感兴趣的其它话题。
/// <seealso cref="System.Net"/>
前面的例子告诉读者,他可能也想查阅System.Net 名字空间的文档。你一定要给超出当前范围的项目规定一个完全资格名。
作为许诺,清单9.5 包含 RequestWebPage类中正在工作的文档的所有例子。看一下如何使用标签以及嵌套如何为组件产生文档。
清单 9.5 利用 <summary>, <see>, <para>, and <seealso> 标签描述一个成员
using System;
using System.Net;
using System.IO;
using System.Text;

/// <summary>Class to tear a Webpage from a Webserver</summary>
public class RequestWebPage
{
    private const int BUFFER_SIZE = 128;

    /// <summary>m_strURL stores the URL of the Webpage</summary>
    private string m_strURL;

    /// <summary>RequestWebPage() is the constructor for the class
    /// <see cref="RequestWebPage"/> when called without arguments.</summary>
    public RequestWebPage()
    {
    }

    /// <summary>RequestWebPage(string strURL) is the constructor for the class
    /// <see cref="RequestWebPage"/> when called with an URL as parameter.</summary>
    public RequestWebPage(string strURL)
    {
        m_strURL = strURL;
    }

    public string URL
    {
        get { return m_strURL; }
        set { m_strURL = value; }
    }

    /// <summary>The GetContent(out string strContent) method:
    /// <para>Included in the <see cref="RequestWebPage"/> class</para>
    /// <para>Uses variable <see cref="m_strURL"/></para>
    /// <para>Used to retrieve the content of a Webpage. The URL
    /// of the Webpage (includinghttp://) must already be
    /// stored in the private variable m_strURL.
    /// To do so, call the constructor of the RequestWebPage
    /// class, or set its property <see cref="URL"/> to the URL string.</para>
    /// </summary>
    /// <seealso cref="System.Net"/>
    /// <seealso cref="System.Net.WebResponse"/>
    /// <seealso cref="System.Net.WebRequest"/>
    /// <seealso cref="System.Net.WebRequestFactory"/>
    /// <seealso cref="System.IO.Stream"/>
    /// <seealso cref="System.Text.StringBuilder"/>
    /// <seealso cref="System.ArgumentException"/>

    public bool GetContent(out string strContent)
    {
        strContent = "";
        // ...
        return true;
    }
}
9.2.2 添加备注和列表
<remarks>标签是规定大量文档的地方。与之相比,<summary>只仅仅规定了成员的简短描述。
你不限于只提供段落文本(使用<para>标签)。例如,你可以在备注部分包含bulleted(和有限偶数)列表(list):
/// <list type="bullet">
/// <item>Constructor
/// <see cref="RequestWebPage()"/> or
/// <see cref="RequestWebPage(string)"/>
/// </item>
/// </list>
这个list有一项(item),且该item引用了两个不同的构造函数描述。你可以根据需要,任意往list item中添加内容。
另一个在备注部分很好用的标签是<paramref>。例如,你可以用<paramref>来引用和描述传递给构造函数的参数:
/// <remarks>Stores the URL from the parameter /// <paramref name="strURL"/> in
/// the private variable <see cref="m_strURL"/>.</remarks>
public RequestWebPage(string strURL)
在清单9.6中,你可以看到所有的这些以及前面的标签正在起作用。
清单9.6 为文档添加一个备注和bullet list
using System;
using System.Net;
using System.IO;
using System.Text;

/// <summary>Class to tear a Webpage from a Webserver</summary>
/// <remarks>The class RequestWebPage provides:
/// <para>Methods:
/// <list type="bullet">
/// <item>Constructor
/// <see cref="RequestWebPage()"/> or
/// <see cref="RequestWebPage(string)"/>
/// </item>
/// </list>
/// </para>
/// <para>Properties:
/// <list type="bullet">
/// <item>
/// <see cref="URL"/>
/// </item>
/// </list>
/// </para>
/// </remarks>
public class RequestWebPage
{
    private const int BUFFER_SIZE = 128;

    /// <summary>m_strURL stores the URL of the Webpage</summary>
    private string m_strURL;

    /// <summary>RequestWebPage() is the constructor for the class
    /// <see cref="RequestWebPage"/> when called without arguments.</summary>
    public RequestWebPage()
    {
    }

    /// <summary>RequestWebPage(string strURL) is the constructor for the class
    /// <see cref="RequestWebPage"/> when called with an URL as parameter.</summary>
    /// <remarks>Stores the URL from the parameter <paramref name="strURL"/> in
    /// the private variable <see cref="m_strURL"/>.</remarks>
    public RequestWebPage(string strURL)
    {
        m_strURL = strURL;
    }

    /// <remarks>Sets the value of <see cref="m_strURL"/>.
    /// Returns the value of <see cref="m_strURL"/>.</remarks>
    public string URL
    {
        get { return m_strURL; }
        set { m_strURL = value; }
    }

    /// <summary>The GetContent(out string strContent) method:
    /// <para>Included in the <see cref="RequestWebPage"/> class</para>
    /// <para>Uses variable <see cref="m_strURL"/></para>
    /// <para>Used to retrieve the content of a Webpage. The URL
    /// of the Webpage (includinghttp://) must already be
    /// stored in the private variable m_strURL.
    /// To do so, call the constructor of the RequestWebPage
    /// class, or set its property <see cref="URL"/> to the URL string.</para>
    /// </summary>
    /// <remarks>Retrieves the content of the Webpage specified in
    /// the property<see cref="URL"/> and hands it over to the out
    /// parameter <paramref name="strContent"/>.
    /// The method is implemented using:
    /// <list>
    /// <item>The <see cref="System.Net.WebRequestFactory.Create"/>method.</item>
    /// <item>The <see cref="System.Net.WebRequest.GetResponse"/> method.</item>
    /// <item>The <see cref="System.Net.WebResponse.GetResponseStream"/>method</item>
    /// <item>The <see cref="System.IO.Stream.Read"/> method</item>
    /// <item>The <see cref="System.Text.StringBuilder.Append"/> method</item>
    /// <item>The <see cref="System.Text.Encoding.ASCII"/> property together with its
    /// <see cref="System.Text.Encoding.ASCII.GetString"/> method</item>
    /// <item>The <see cref="System.Object.ToString"/> method for the
    /// <see cref="System.IO.Stream"/> object.</item>
    /// </list>
    /// </remarks>
    /// <seealso cref="System.Net"/>
    public bool GetContent(out string strContent)
    {
        strContent = "";
        // ...
        return true;
    }
}
9.2.3 提供例子
要想说明一个对象和方法的用法,最好的办法是提供优秀源代码的例子。因此,不要诧异文档注释也有用于声明例子的标签: <example> 和 <code>。 <example>标签包含了包括描述和代码的整个例子,而 <code> 标签仅包含了例子的代码(令人惊讶)。
清单9.7 说明如何实现代码例子。包括的例子用于两个构造函数。你必须给GetContent方法提供例子。
清单.7 利用例子解释概念
using System;
using System.Net;
using System.IO;
using System.Text;

/// <summary>Class to tear a Webpage from a Webserver</summary>
/// <remarks> ... </remarks>
public class RequestWebPage
{
    private const int BUFFER_SIZE = 128;

    /// <summary>m_strURL stores the URL of the Webpage</summary>
    private string m_strURL;

    /// <summary>RequestWebPage() is ... </summary>
    /// <example>This example shows you how to call the constructor
    /// of the class RequestWebPage() without arguments:
    /// <code>
    /// public class MyClass
    /// {
    /// public static void Main()
    /// {
    /// public
    /// string strContent;
    /// RequestWebPage objRWP = new RequestWebPage();
    /// objRWP.URL = "http://www.alphasierrapapa.com";
    /// objRWP.GetContent(out strContent);
    /// Console.WriteLine(strContent);
    /// }
    /// }
    /// </code>
    /// </example>
    public RequestWebPage()
    {
    }

    /// <summary>RequestWebPage(string strURL) is ... </summary>
    /// <remarks> ... </remarks>
    /// <example>This example shows you how to call
    /// RequestWebPage() with the URL parameter:
    /// <code>
    /// public class MyClass
    /// {
    /// public static void Main()
    /// {
    /// string strContent;
    /// RequestWebPage objRWP = new RequestWebPage("http://www.alphasierrapapa.com");
    /// objRWP.GetContent(out strContent);
    /// Console.WriteLine("\n\nContent of the Webpage "+ objRWP.URL+":\n\n");
    /// Console.WriteLine(strContent);
    /// }
    /// }
    /// </code>
    /// </example>
    public RequestWebPage(string strURL)
    {
        m_strURL = strURL;
    }

    /// <remarks> ... </remarks>
    public string URL
    {
        get { return m_strURL; }
        set { m_strURL = value; }
    }

    /// <summary>The GetContent(out string strContent) method: ... </summary>
    /// <remarks> ... </remarks>
    /// <seealso cref="System.Net"/>
    public bool GetContent(out string strContent)
    {
        strContent = "";
        // ...
        return true;
    }
}
9.2.4 描述参数
到目前为止,我忽略的一项重要任务是正确地描述构造函数、方法等的参数。但再一次,它很简单。你所要做的就是插入一个<param>标签,就像这样:
An important task I have neglected so far is properly describing the parameters of constructors, methods, and the like. But once again, it is pretty straightforward. All you have to do is insert a <param> tag, like this
/// <param name=”strURL”>
/// Used to hand over the URL of the Webpage to the object.
/// Its value is stored in the private variable <see cref=”m_strURL”/>.
/// </param>
此定义适用于一个简单的in参数。注意,您也可以在<param>标签内部使用<para>标签。
This definition was for a simple in parameter. Note that you could also use <para> inside the <param> tag.
对返回参数的描述方式略有不同:
A return parameter is described in a slightly different way:
/// <returns>
/// <para>true: Content retrieved</para>
/// <para>false: Content not retrieved</para>
/// </returns>
如您所见,返回参数的描述在<return>标签中。在清单9.8中你可以看到使用参数描述的完整示例。
As you can see, a return parameter is described inside the <returns> tag. The complete example of using parameter description is shown in Listing 9.8.
清单9.8 描述方法参数和返回值
Listing 9.8 Describing Method Parameters and Return Values
using System;
using System.Net;
using System.IO;
using System.Text;

/// <summary>Class to tear a Webpage from a Webserver</summary>
/// <remarks> ... </remarks>
public class RequestWebPage
{
    private const int BUFFER_SIZE = 128;

    /// <summary>m_strURL stores the URL of the Webpage</summary>
    private string m_strURL;

    /// <summary>RequestWebPage() is ... </summary>
    /// <example>This example ...
    /// <code>
    /// public class MyClass
    /// {
    /// ...
    /// }
    /// </code>
    /// </example>
    public RequestWebPage()
    {
    }

    /// <summary>RequestWebPage(string strURL) is ... </summary>
    /// <remarks> ... </remarks>
    /// <param name="strURL">
    /// Used to hand over the URL of the Webpage to the object.
    /// Its value is stored in the private variable <see cref="m_strURL"/>.
    /// </param>
    /// <example> ... </example>
    public RequestWebPage(string strURL)
    {
        m_strURL = strURL;
    }

    /// <remarks> ... </remarks>
    public string URL
    {
        get { return m_strURL; }
        set { m_strURL = value; }
    }

    /// <summary>The GetContent(out string strContent) method: ... </summary>
    /// <remarks>Retrieves the content of the Webpage specified in the property
    /// <see cref="URL"/> and hands it over to the out parameter
    /// <paramref name="strContent"/>.
    /// The method is implemented using ...
    /// </remarks>
    /// <param name="strContent">Returns the Content of the Webpage </param>
    /// <returns>
    /// <para>true: Content retrieved</para>
    /// <para>false: Content not retrieved</para>
    /// </returns>
    /// <seealso cref="System.Net"/>
    public bool GetContent(out string strContent)
    {
        strContent = "";
        // ...
        return true;
    }
}
9.2.5 描述属性
要描述类的属性,必须使用一个特殊标签:<value>标签。使用此标签,可以专门标记属性,并且<value>标签或多或少地替换了<summary>标签。
To describe a class’s properties, you must use a special tag: the <value> tag. With this tag, you can specifically flag a property, and the <value> tag more or less replaces the <summary> tag.
清单 9.9 包含 RequestWebPage 类的 URL 属性的属性描述(第 30 行及以下)。花时间再次查看可用于记录组件的其他标签。
Listing 9.9 contains a property description for the URL property of the RequestWebPage class (lines 30 and following). Take the time to once again look at the other tags you can use to document your component.
清单 9.9 使用 <value> 标签添加属性描述
Listing 9.9 Adding Property Descriptions with the <value> Tag
using System;
using System.Net;
using System.IO;
using System.Text;

/// <summary>Class to tear a Webpage from a Webserver</summary>
/// <remarks> ... </remarks>
public class RequestWebPage
{
    private const int BUFFER_SIZE = 128;

    /// <summary>m_strURL stores the URL of the Webpage</summary>
    private string m_strURL;

    /// <summary>RequestWebPage() is ... </summary>
    /// <example> ... </example>
    public RequestWebPage()
    {
    }

    /// <summary>RequestWebPage(string strURL) is ... </summary>
    /// <remarks> ... </remarks>
    /// <param name="strURL"> ... </param>
    /// <example>This example ... </example>
    public RequestWebPage(string strURL)
    {
        m_strURL = strURL;
    }

    /// <value>The property URL is to get or set the URL for the Webpage </value>
    /// <remarks>Sets the value of <see cref="m_strURL"/>.
    /// Returns the value of <see cref="m_strURL"/>.</remarks>
    public string URL
    {
        get { return m_strURL; }
        set { m_strURL = value; }
    }

    /// <summary>The GetContent(out string strContent) method: ... </summary>
    /// <remarks>Retrieves the content of the Webpage specified in the property
    /// <see cref="URL"/> and hands it over to the out parameter
    /// <paramref name="strContent"/>.
    /// The method is implemented using: ...
    /// </remarks>
    /// <param name="strContent">Returns the Content of the Webpage</param>
    /// <returns>
    /// <para>true: Content retrieved</para>
    /// <para>false: Content not retrieved</para>
    /// </returns>
    /// <seealso cref="System.Net"/>
    public bool GetContent(out string strContent)
    {
        strContent = "";
        // ...
        return true;
    }
}
9.2.6 编译文档
组件的文档流程现已完成。已经彻底记录了构造函数、方法、属性、参数等。现在,您希望根据源代码中的文档注释创建 XML 文件,并能够将其发送给您的客户。好消息是您所要做的就是使用编译器开关 /doc:
The documentation process of your component is now complete. You have thoroughly documented your constructors, methods, properties,parameters, and so on. Now you want to create the XML file, based on the documentation remarks in your source code, and be able to ship it to your customers. The good news is that all you have to do is use the compiler switch /doc:
csc /r:System.Net.dll /doc:wrq.xml /t:library /out:wrq.dll wrq.cs
有问题的编译器开关是/doc:docfilename.xml。鉴于您在文档中没有犯错误(是的,已检查其有效性!),您现在拥有一个描述组件的 XML 文件。
The compiler switch in question is /doc:docfilename.xml. Given that you didn’t make errors in your documentation (yes, it is checked for validity!), you now have an XML file that describes your component.
我希望您在 Internet Explorer 中打开它,而不是将整个 XML 文件作为列表显示,如图 9.1 所示。使用 Internet Explorer,您可以浏览层次结构以及从文档注释生成的信息。
Instead of showing you the entire XML file as a listing, I want you to open it in Internet Explorer, as shown in Figure 9.1. Using Internet Explorer, you can browse the hierarchy and the information that were generated from your documentation comments.
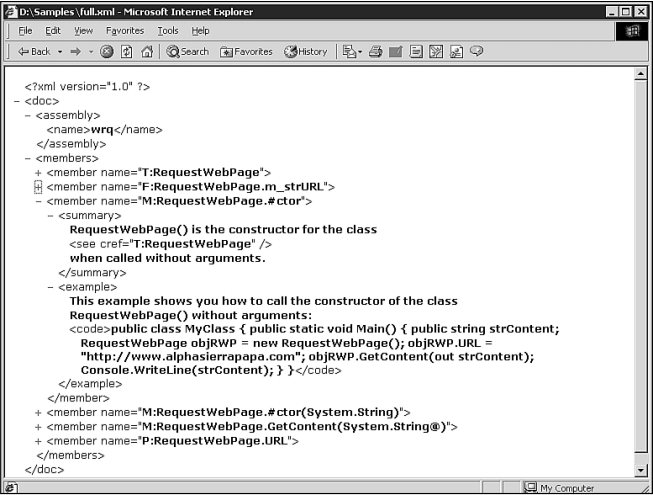
图 9.1 在 Internet Explorer 中查看文档 XML 文件。
Figure 9.1 Viewing the documentation XML file in Internet Explorer
虽然我不想太深入地研究生成的 XML 文件的语义,但我确实想解释如何为您记录的元素生成 ID(成员的名称属性)。 ID 的第一部分(冒号之前)由类型确定:
Although I do not want to dig too deep into the semantics of the XML file that is generated, I do want to explain how the ID (the member’s name attribute) is generated for the elements you have documented. The first part of the ID (before the colon) is determined by the type:
N — 表示命名空间。
T — 标识一个类型。可以是类、接口、结构、枚举或委托。
F — 描述类的一个字段。
P — 指属性,也可以是索引器或索引属性
M — 标识一个方法。这包括特殊方法,例如构造函数和运算符。
E — 事件由大写 E 表示
! — 表示错误字符串;提供有关 C# 编译器无法解析的链接的信息。
N—Denotes a namespace.
T—Identifies a type. This can be class, interface, struct, enum, or delegate.
F—Describes a field of a class.
P—Refers to a property, which can also be an indexer or indexed property.
M—Identifies a method. This includes special methods such as constructors and operators.
E—Events are denoted by a capital E.
!—Denotes an error string; provides information about a link that the C# compiler could not resolve.
冒号后面是元素的完全限定名称,包括根命名空间以及封闭类型。如果元素的名称中包含句点,则这些句点将替换为井号#。方法的参数括在括号中,并用逗号分隔参数。元素类型由.NET 签名进行编码,可以在 .NET SDK 文档中找到这些类型的列表。
Following the colon is the fully qualified name of the element, including the root of the namespace, as well as enclosing types. If the element has periods in its name, these are replaced by the hash sign, #. Parameters for methods are enclosed in parentheses, and commas separate the arguments. The element type is encoded by its .NET signature, and a list of these can be found in the .NET SDK documentation.
一般情况下,您不必关心上述XML文档细节。只需创建 XML 文件并将其与您的组件一起发送给编程工具的用户就会对您的软件感到非常满意!
Under normal circumstances, you do not have to care about the preceding XML documentation details. Just create and ship the XML file with your component and users of programming tools will be very happy with your software!
9.3 为代码编写版本号(Versioning Your Code)
版本控制是一个如今被称为“DLL 地狱”的问题。应用程序安装并使用共享组件,而一个应用程序最终会因为与当前安装的组件版本不兼容而崩溃。如今,共享组件带来的问题比它们解决的问题还要多。
Versioning is a problem that is known today as “DLL Hell.” Applications install and use shared components, and one application eventually breaks because it is not compatible with the currently installed version of the component. Shared components today present more problems than they solve.
解决版本控制问题是CLR 的主要目标之一。新方法的中心阶段是 .NET 组件(同样,这是一个指包装而不是内容的术语),它使开发人员能够指定不同软件之间的版本依赖关系,并且CLR在运行时强制执行这些规则。
One of the primary goals of the CLR is to solve the versioning problem. At center stage of the new approach are the .NET components (again, this is a term refering to the packaging, not the contents), which enable the developer to specify version dependencies between different pieces of software, and the CLR enforces those rules at runtime.
我想向您介绍 .NET 组件,展示它们可以用于什么,以及在版本控制方面与当今的 DLL 存在哪些差异。
I want to introduce you to .NET components, show what they can be used for, and what differences exist from today’s DLLs with regard to versioning.
9.3.1 .NET 组件(.NET Components)
尽管当时我没有专门将其称为.NET组件,但您编译的第一个库是.NET组件 — 默认情况下,C# 编译器始终为可执行文件创建.NET 组件。那么,什么是.NET组件呢?
Although I didn’t specifically call it an .NET component back then, the first library you compiled was an .NET component—the C# compiler, by default, always creates .NET components for your executables. So, what then is an .NET component?
首先,.NET组件是CLR中共享和重用的基本单位。因此,版本控制是在组件级别强制执行的。 .NET 组件也是安全实施、类部署和类型解析的边界。您构建的应用程序通常由多个 .NET 组件组成。
First of all, an .NET component is the fundamental unit of sharing and reuse in the CLR. Therefore, versioning is enforced on the component level. An .NET component also is the boundary for security enforcement, class deployment, and type resolution. An application you build will be typically comprised of multiple .NET components.
因为我们正在讨论版本控制,所以 .NET 组件版本号是什么样的?一般来说,它由四个部分组成:
Because we are talking about versioning, what does an .NET component version number look like? In general, it is comprised of four parts:
major version.minor version.build number.revision
主要版本.次要版本.内部版本号.修订版
该版本号称为兼容版本。类加载器使用它来决定加载哪个版本的 .NET 组件(如果存在不同版本)。当主版本和次版本与请求的版本不同时,该版本被视为不兼容。也许兼容意味着内部版本号与请求的版本不同。最后,如果版本不同,则被认为是QFE(快速修复工程),并且通常被认为是兼容的。
This version number is called the compatibility version. It is used by the class loader to decide which version of an .NET component to load, if different versions exist. A version is considered incompatible when major version.minor version is different from the requested version. Maybe compatible means that build number is different from the requested version. Finally, if revision is different, it is considered a QFE (Quick Fix Engineering), and generally considered compatible.
A second version number is stored in your component: the informational version. As the name implies, the informational version is considered only for documentation purposes, and its contents are something like SuperControl Build 1890. The informational version provides a textual representation that means something to a human, but not to the machine.
Before going on to explain private and shared .NET components, I still owe you the command switch that you use for the compiler to add version information to your component. It is the /a.version switch.
csc /a.version:1.0.1.0 /t:library /out:wrq.dll wrq.cs
This creates a library with version information of 1.0.1.0. You can verify this by right-clicking the library in Explorer and inspecting the Version tab of the Properties dialog box.
9.3.2 私有.NET 组件(Private .NET Components)
When you link an application to an .NET component (with /reference:libname), the development tool records the dependency information, including the version of the linked libraries. This dependency information is recorded in the manifest, and the CLR uses the contained version numbers to load the appropriate version of a dependent .NET component at runtime.
Do you think the .NET components you built so far in this book were version-checked before they were loaded? No, they weren’t because any .NET component that resides in the application’s paths is considered private and is not version-checked. The reason for this behavior is that you are in charge of what you place in your application directory, and you will have tested compatibility before shipping the application.
Now, is it bad to have private .NET components? Actually, no. There is no way any other application could break yours by installing a shared component because you don’t use one. The only disadvantage is that your application uses more disk space. But avoiding versioning problems in this way is definitely worth a few bytes.
9.3.3 共享.NET 组件(Shared .NET Components)
If you are building software you want to share between multiple applications, you have to install it as a shared .NET component. There are some extra things you must take care of, however.
For starters, you need a strong name for your .NET component. Some of you might already have wondered where the replacement is for the ubiquitous globally unique ID (GUID) of COM. As long as you use private .NET components, this is not necessary. When you start using shared .NET components, however, you must guarantee that their names are unique.
Their uniqueness is guaranteed via standard public key cryptography:You use a private key to sign your .NET component, and applications that link to your component have the public key to verify the component’s originator (you). After signing your .NET component, you can deploy it to the global .NET component cache or the application directory. The runtime takes care of mapping to all applications.
Is it a good idea to create a shared .NET component? Personally, I don’t think so. You once again take the risk of creating something similar to DLL Hell, although application developers depending on your component could avoid those problems by specifying binding policies. Because disk space isn’t expensive today, I highly recommend using private .NET components, and assigning strong names to them.
9.4 小结(Summary)
In this chapter, I introduced three techniques you should consider before deploying your components or applications. The first consideration is using conditional compilation. Using either the C# preprocessor or the conditional attribute, you can exclude or include code based on a single or several defined symbols. This enables you to conditionally compile debug versions, release versions, or whatever versions you want to build.
The documentation of your components should play an important part during development, and not just be a mere afterthought. Because C# offers you automated generation of documentation via documentation comments, I explained this feature at great length. This feature is especially useful because it enables your software to integrate its help and documentation easily with tools such as Visual Studio.NET.
Finally, I talked about versioning in the CLR and its smallest unit: the .NET component. You have a choice of creating private or shared .NET components, but I recommend that you stick to private ones because you avoid all the problems that are associated with shared components.